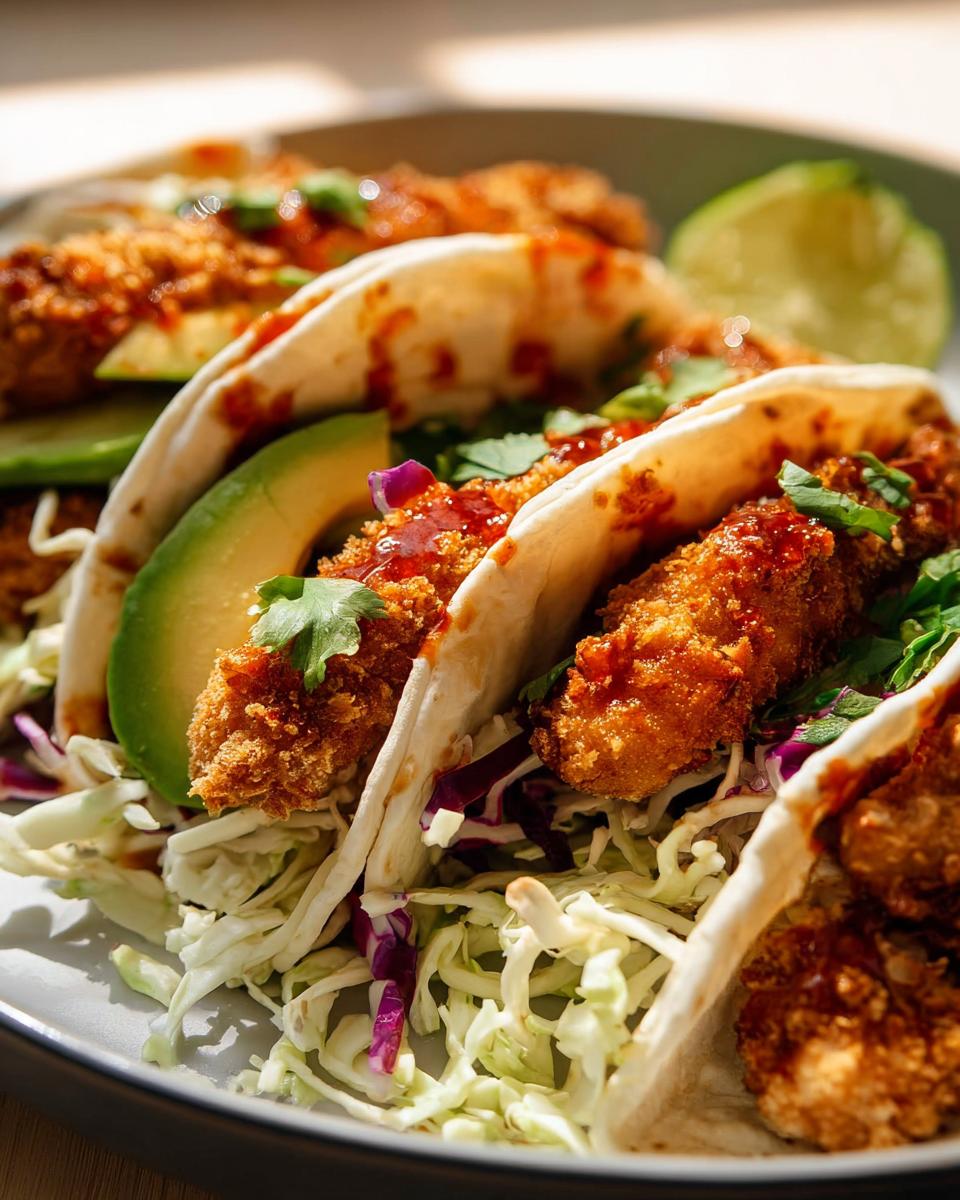
Struggling to find a dinner that makes kids cheer and adults excited? I have your solution. These crunchy chicken taco fingers are the ultimate weeknight win, merging the crispy joy of chicken fingers with the fun of taco night into one handheld, dippable meal.

This isn’t your standard taco. After years of testing in my real, often messy kitchen, I perfected a baked coating that delivers serious crunch without the fuss of frying. The secret isn’t complicated, it’s about a clever three-step breading and a hot oven. The result is golden, crunchy chicken taco fingers ready for a warm tortilla, cool slaw, and creamy avocado.
Nothing beats the happy chaos of a table where everyone builds their own. Let’s walk through how simple this family favorite truly is.
Table of Contents
Why You’ll Love These Crunchy Chicken Taco Fingers
This recipe is my go-to for turning a regular Tuesday into something special. It solves the dinner dilemma with flavor and fun.
- A Brilliant Mashup: It combines the crispy, dippable appeal of chicken fingers with the interactive joy of taco night. Everyone gets to build their perfect bite.
- Baked, Not Fried: You get that satisfying, golden crunch without the mess and grease of a deep fryer. Cleanup is a breeze with just one baking sheet.
- Next-Level Crunch: The mix of light, airy panko breadcrumbs and warm taco spices creates a coating that stays incredibly crispy, even when tucked into a soft tortilla.
- Seriously Fast: From fridge to table in about 30 minutes. It’s a real lifesaver when homework and hunger collide.
- Make It Your Own: Set out different sauces, cheeses, and veggies. It’s a recipe that happily adapts to what you have and what your family loves.
- Universal Appeal: I’ve watched picky kids devour these while adults rave about the bold seasoning. It’s a true crowd-pleaser for any casual gathering.
In short, this easy weeknight dinner delivers maximum flavor with minimal fuss. It’s the family friendly taco upgrade you’ve been looking for.
Gathering your ingredients for these crunchy chicken taco fingers feels like setting the stage for a great meal. We are using simple pantry staples in a smart way to build layers of flavor and that signature crunch. I have broken everything down into three easy groups so you can grab and go.
- For the Chicken & Coating:
- 1.5 pounds boneless, skinless chicken tenderloins, cut into 1.5-inch strips: Tenderloins are my first choice because they cook so fast and evenly. If you are using chicken breasts, just slice them against the grain into strips for the most tender bite.
- 1/4 cup all-purpose flour: This is our first layer, creating a dry base for the wet mixture to stick to.
- 2 large eggs: They bind everything together.
- 2 tablespoons mayonnaise: Here is a little secret. The mayo adds a touch of richness and helps the coating cling to the chicken beautifully, preventing it from sliding off.
- 1 tablespoon olive oil: This adds flavor and helps the egg wash emulsify.
- 2 cups panko breadcrumbs: This is the key to the crunch. Panko has a lighter, airier texture than regular breadcrumbs, giving you a crisper, less dense coating that stays crunchy.
- For the Taco Seasoning:
- 2 teaspoons chili powder, 1 teaspoon ground cumin, 1 teaspoon garlic powder, 1 teaspoon onion powder, 1 teaspoon dried oregano, 1/2 teaspoon salt: This is our flavor powerhouse. Mixing your own blend is so much fresher than a packet.
- 1/4 teaspoon cayenne pepper (optional): Use this if your crew likes a little kick. You can always leave it out for a totally mild version.
- For Assembly:
- 12 small (taco-size) flour tortillas: Warm them up for the best, most pliable texture.
- 1 cup shredded coleslaw mix: The cool, crisp crunch is the perfect contrast to the hot chicken.
- 1/4 cup chopped fresh cilantro: A bright, fresh pop of flavor.
- 1 ripe avocado, sliced: For creamy richness.
- Salsa or hot sauce, for serving: The final flourish for dipping or drizzling.
Quick Substitution Tip: For a gluten-free version, simply swap in gluten-free panko breadcrumbs and use your favorite corn tortillas. With everything ready, you are just a few simple steps away from the best crunchy chicken taco fingers.
How to Make Crunchy Chicken Taco Fingers
Now for the fun part. Let’s turn those simple ingredients into your new favorite dinner. I will walk you through each step, just like I am right there in the kitchen with you.

Step 1: Prep Your Station
First, get your oven hot and ready. Preheat it to 400°F (200°C). Grab a large baking sheet and line it with parchment paper. Then, place a wire rack on top of the parchment. Give that rack a quick spray with cooking oil. This setup is my non-negotiable secret for the crispiest chicken taco fingers. The rack lets hot air circulate all around the chicken, so the bottom gets just as crunchy as the top. No soggy spots allowed.
Step 2: Create Your Coating Trio
Set up three shallow dishes in a row on your counter. This is your assembly line. In the first dish, whisk together the panko breadcrumbs and all the dried spices. That is your chili powder, cumin, garlic powder, onion powder, oregano, salt, and optional cayenne. Mix it really well so every bit of panko is flavored. In the second dish, crack in the two eggs. Add the mayonnaise and olive oil. Whisk it all until it is completely smooth and creamy. Place the flour by itself in the third dish. You are now ready to coat.
Step 3: Coat the Chicken Strips
Take a few chicken strips at a time. Pat them dry with a paper towel first. This helps everything stick. Now, follow the order. First, dredge a strip in the flour. Shake off any loose flour. Next, dip it fully into the egg and mayo mixture. Let any excess drip back into the bowl. Finally, press the chicken firmly into the seasoned panko. Do not just dip it. Use your hands to press the crumbs on so you get a thick, even, generous coating. Place the finished strip on your prepared wire rack. Repeat with the rest of the chicken, leaving a little space between each strip on the rack.
Step 4: Bake to Golden Perfection
Slide the baking sheet into your hot oven. Bake for 12 to 15 minutes. The exact time depends on how thick your chicken strips are. You will know they are done when the coating is a deep, golden brown and the chicken is cooked through. For absolute certainty, use a meat thermometer. It should read 165°F in the thickest part of a strip. For an even more dramatic crunch, you can give the coated chicken a light spray of cooking oil right before it goes in the oven.
Step 5: Warm Tortillas & Assemble
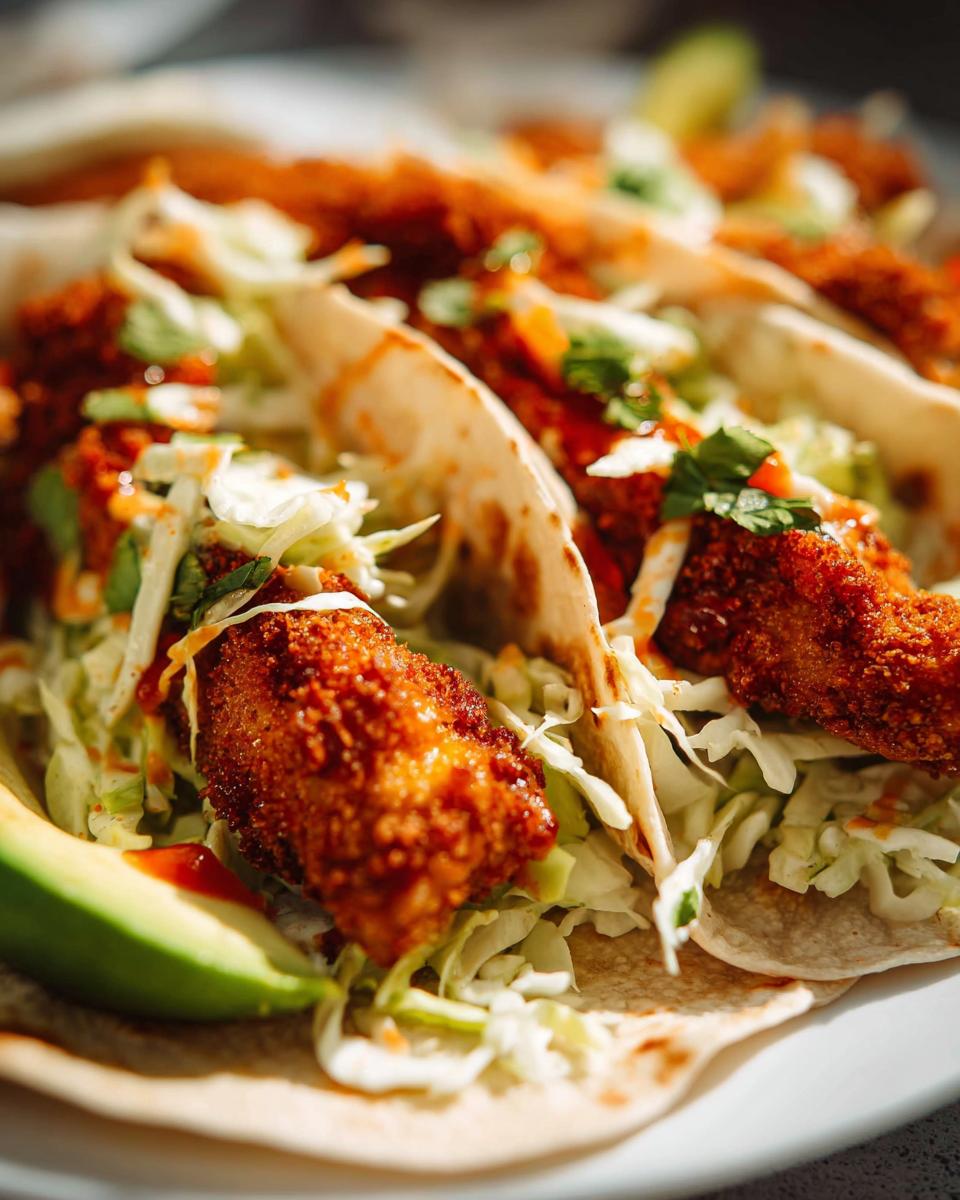
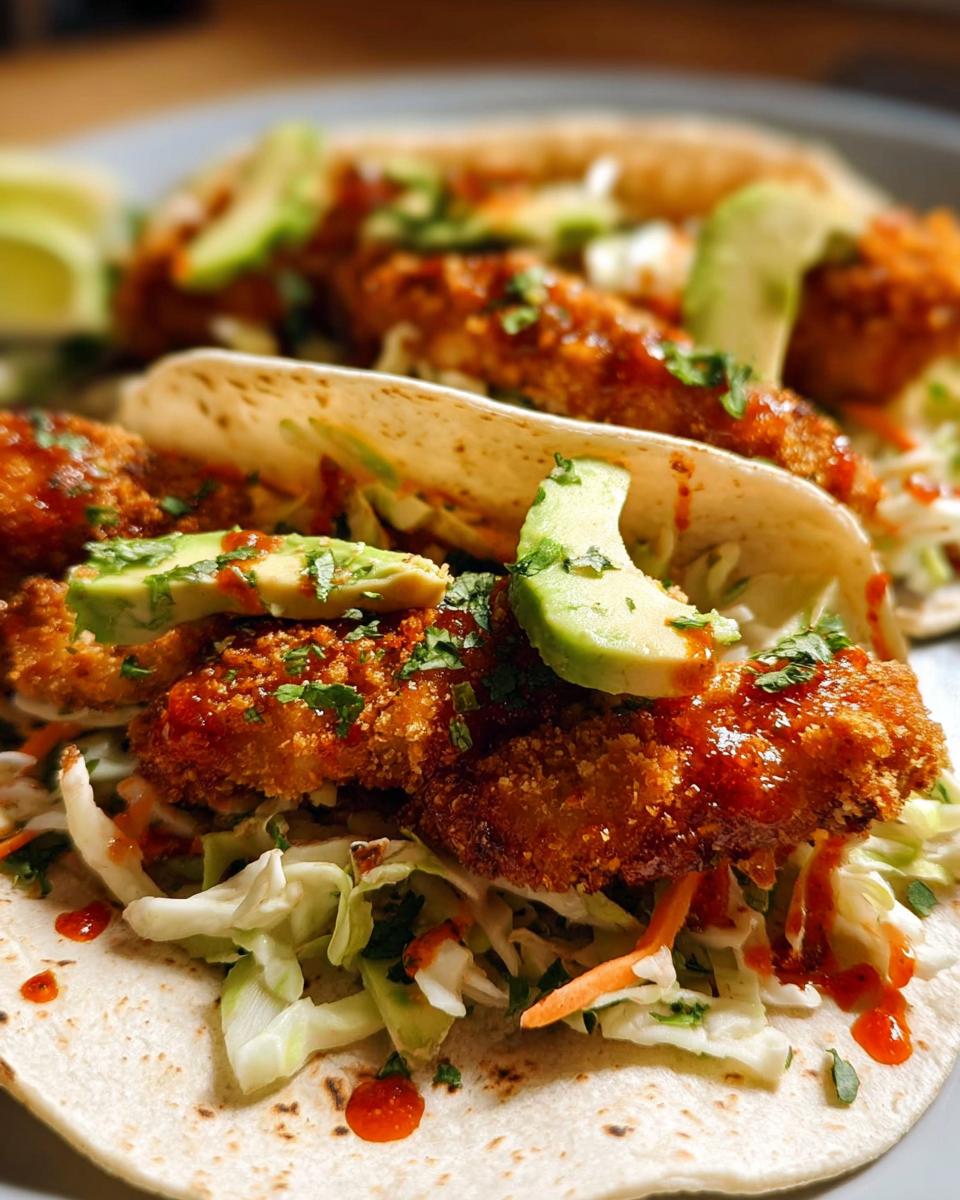
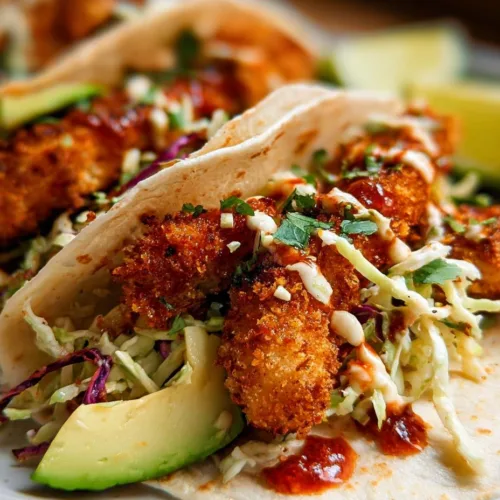
While the chicken bakes, warm your tortillas. I wrap them in a damp paper towel and microwave them for about 30 seconds. You can also warm them in the oven for the last few minutes. Now, build your crunchy chicken taco fingers. Take a warm tortilla, add a small handful of the cool slaw mix, top with one or two hot chicken fingers, and finish with a couple slices of creamy avocado. Serve them right away with salsa or hot sauce on the side for dipping. Dinner is served.
Pro Tips for the Best Crunchy Chicken Taco Fingers
Want that perfect, shatteringly crisp coating every single time? These little kitchen tricks make all the difference. They are the secrets I have learned from making this recipe again and again for my hungry family.
- Always Use a Wire Rack: This is my number one rule for crispy baked chicken. Placing the chicken on a rack over the baking sheet allows hot air to circulate completely. It prevents steam from getting trapped underneath, which is what causes a soggy bottom. Every side gets evenly golden and crunchy.
- Start with Dry Chicken: Always pat your chicken strips thoroughly with a paper towel before you start coating. Even a little moisture will make the flour slide right off, leading to patchy breading. A dry surface is the best foundation for a great crust.
- Press, Don’t Just Dip: When you get to the panko, really press the chicken into the crumbs. Use your fingers to pack them on. A gentle dip gives a thin coating, but a firm press creates that thick, restaurant-style crust we all love.
- Let the Coating Set: After you place the breaded strips on the rack, let them sit for about 5 minutes before baking. This brief rest helps the coating hydrate and adhere. It is less likely to fall off during baking.
- Give Them Space: Do not crowd the chicken strips on the baking rack. Leave a little room between each piece. This ensures proper hot air flow, so they cook evenly and crisp up instead of steaming each other.
- Allison’s Secret for Leftovers: To refresh leftovers and bring back the crunch, reheat them in an air fryer or a 375°F oven for 5-7 minutes. The microwave will make them soft. This trick works perfectly for meal prep, too.
Follow these simple tips, and you will master how to get a crunchy coating that holds up beautifully, even inside a warm tortilla.
Common Mistakes to Avoid
Even the best recipes can hit a small snag. Knowing these common pitfalls will help you nail your crunchy chicken taco fingers on the first try. Think of this as your friendly guide to a flawless dinner.
- Skipping the wire rack: Placing the chicken directly on a baking sheet traps steam. This creates a soggy, soft bottom crust. The simple fix is to always use a wire rack. It lets hot air flow underneath for 360-degree crispiness.
- Starting with wet chicken: If your chicken strips are damp, the flour coating will turn pasty and slide right off. Always take 30 seconds to pat the strips completely dry with paper towels. A dry surface is key for the coating to stick.
- Rushing the coating process: Speeding through the flour, egg, and panko steps leads to a thin, patchy crust. For the best adhesion, take your time. Let excess flour shake off, let extra egg drip away, and press firmly into the panko for a thick, even layer.
- Overbaking the chicken: Baking too long dries out the juicy chicken inside. Chicken is perfectly done at 165°F. Use a meat thermometer to check a thicker strip at the 12-minute mark. It is the only sure way to get juicy meat with a golden brown crust.
- Using cold tortillas: A cold tortilla can crack when folded and lacks that warm, soft texture. Always warm your tortillas for 30 seconds in the microwave or in the oven while the chicken finishes baking. A warm tortilla makes assembly easy and tastes much better.
Keep these tips in mind, and you will avoid the small errors that make a big difference in your final dish.
Delicious Variations
One of the best things about this recipe is how easily it adapts. These crunchy chicken taco fingers are a fantastic base for your own creative twists. Here are a few of my favorite ways to mix things up when I am feeling playful.
- Cheesy Crunch: For a savory, salty kick, add 1/2 cup of finely grated Parmesan or crumbled cotija cheese right into the panko and spice mixture. The cheese melts as it bakes, creating an extra flavorful and golden crust with little crispy bits.
- Swap the Protein: The coating method works wonders on other proteins. Try it on strips of firm white fish like cod or tilapia, baking until flaky. For a vegetarian option, use large cauliflower florets. Just be sure to pat them very dry before starting the coating process.
- Different Dips: Move beyond salsa. A quick chipotle crema made with sour cream and adobo sauce is smoky and cool. Classic ranch dressing is always a winner with kids. For a bright twist, blend yogurt with cilantro, lime juice, and a pinch of salt.
- Low-Carb Style: Skip the tortilla altogether for a satisfying salad. Serve your hot crunchy chicken taco fingers over a big bed of the coleslaw mix. Drizzle with a little extra sauce and avocado for a complete, hearty meal that is full of flavor and crunch.
Do not be afraid to experiment. The core recipe is your delicious launchpad for a whole new meal.
Serving Suggestions
These crunchy chicken taco fingers are incredibly versatile. Their built-in fun means they shine in so many different settings, from a quiet Tuesday to a big game day gathering.
For a complete weeknight meal, I love pairing them with simple sides like cilantro-lime rice and seasoned black beans. It turns a quick dinner into a full, satisfying feast without extra work.
They are a superstar on any casual party spread. Set them out next to a big bowl of guacamole, tortilla chips, and a cooler of drinks. Let guests build their own plates. It is perfect for game day or a relaxed backyard get-together.
Transform leftovers into a fantastic next-day lunch. Chop up the cold chicken fingers and toss them into a wrap with the leftover slaw and avocado. Add a drizzle of ranch or salsa for a quick, protein-packed meal.
And never forget, these crunchy chicken taco fingers are absolutely delicious all on their own. Serve them straight off the baking sheet with a few dipping sauces like ranch, chipotle mayo, or extra salsa for a high-protein snack everyone will love.
FAQs About Crunchy Chicken Taco Fingers
Got a question? I have probably asked it myself while testing this recipe. Here are the quick, clear answers you need for perfect crunchy chicken taco fingers every time.
Can I make these crunchy chicken taco fingers ahead of time?
Yes, you can prep them ahead. Coat the chicken strips and arrange them on the wire rack. Refrigerate for up to 4 hours before baking. For the absolute best texture and crunch, bake them just before you plan to serve.
Can I freeze them?
Absolutely. First, let the baked chicken fingers cool completely. Spread them in a single layer on a baking sheet and freeze until solid, about 2 hours. Then, transfer them to a freezer bag. Reheat from frozen in a 375°F oven or air fryer until hot and crispy throughout.
What’s the best way to reheat leftovers?
Always use dry heat to bring back the crunch. Reheat leftovers in an air fryer or a conventional oven at 375°F for 5 to 7 minutes. The microwave will steam the coating and make it soft, so I avoid it for this recipe.
Are they spicy?
The base seasoning is warm and flavorful, not spicy. The optional 1/4 teaspoon of cayenne pepper adds a gentle heat. You can easily adjust it. Leave it out for a totally mild version that kids love, or add a pinch more if your family enjoys a kick.
What are the nutrition facts?
Nutrition can vary based on your specific ingredients. A general estimate for one serving of three tacos is about 450 calories. You get plenty of protein from the chicken and healthy fats from the avocado, making it a satisfying and balanced meal.
Time to Build Your Taco Night
And there you have it. Your new secret weapon for a crispy, baked, family-friendly meal that’s ready in just 30 minutes. These crunchy chicken taco fingers are your ticket to turning any ordinary evening into a fun, hands-on feast. I hope your kitchen fills with the sound of crunching and happy chatter tonight. I would love to hear how yours turns out.
Did you add the cheese? Try the fish? Tell me your favorite variation in the comments below. For more easy and delicious dinner ideas that your whole crew will devour, be sure to follow me on Pinterest. Now, go build something delicious.
Crunchy Chicken Taco Fingers
Equipment
- Baking sheet
- Parchment paper
- Wire rack
Ingredients
For the Chicken Coating
- 2 cups panko breadcrumbs
- 2 teaspoons chili powder
- 1 teaspoon cumin
- 1 teaspoon garlic powder
- 1 teaspoon onion powder
- 1 teaspoon dried oregano
- ½ teaspoon salt
- ¼ teaspoon cayenne pepper optional
For the Chicken and Assembly
- 1.5 pounds boneless, skinless chicken tenderloins cut into 1.5 inch strips
- 2 large eggs
- ¼ cup all-purpose flour
- 2 tablespoons mayonnaise
- 1 tablespoon olive oil
- 12 small flour tortillas taco size
- 1 cup shredded coleslaw mix
- ¼ cup chopped fresh cilantro
- 1 ripe avocado sliced
- salsa or hot sauce for serving
Instructions
- Preheat your oven to 400°F (200°C). Line a baking sheet with parchment paper and place a wire rack on top. Lightly spray the wire rack with cooking spray.
- In a shallow dish, combine the panko breadcrumbs, chili powder, cumin, garlic powder, onion powder, oregano, salt, and cayenne pepper (if using). Stir until well mixed.
- In a second shallow dish, whisk together the eggs and mayonnaise until smooth. Stir in the tablespoon of olive oil.
- In a third shallow dish, place the flour.
- Working with a few pieces of chicken at a time, first dredge them in the flour, shaking off any excess.
- Next, dip the floured chicken strips into the egg and mayonnaise mixture, ensuring they are fully coated.
- Finally, press the coated chicken strips into the panko mixture, ensuring they are completely covered. Place the crusted chicken strips on the prepared wire rack.
- Bake for 12 to 15 minutes, or until the chicken is golden brown and cooked through. The time will vary depending on the thickness of your chicken strips.
- While the chicken is baking, warm the tortillas according to package directions. You can wrap them in a damp paper towel and microwave for 30 seconds, or warm them in the oven for the last few minutes of the chicken’s baking time.
- Assemble the taco fingers: Place a warm tortilla on a plate, add a generous portion of shredded coleslaw, top with 1-2 crunchy chicken fingers, and add sliced avocado.